Crochet Pullover Free Pattern
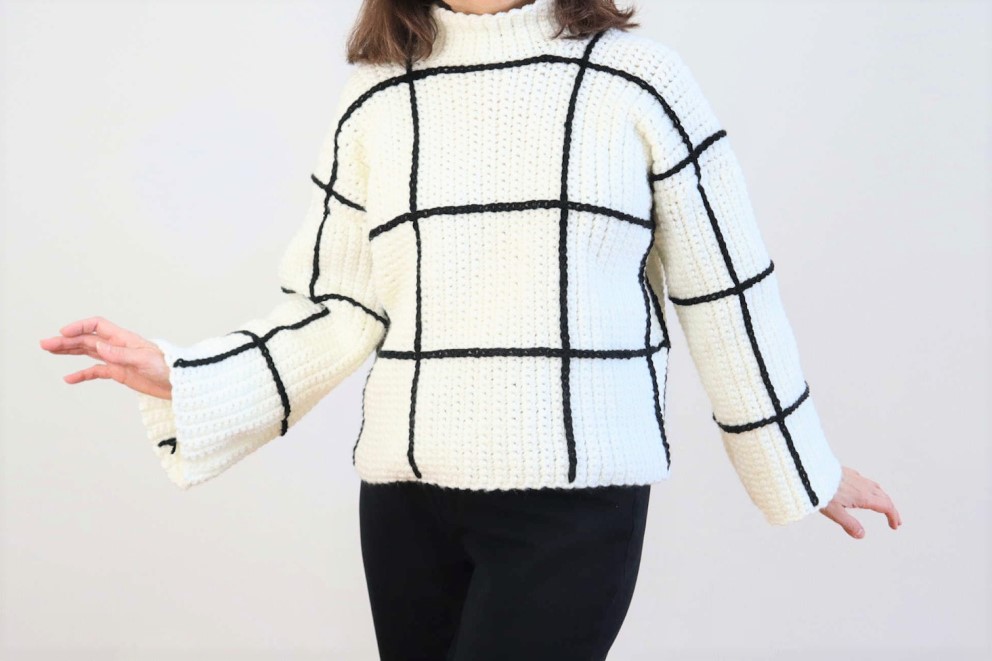
This crochet sweater for women features cool stripes made with the fun crochet surface chain stitch. Use any #4 medium weight yarn. Simple stitches used in a unique way add interest. Easy to wear, boxy style. Crochet pullover FREE PATTERN and Video Tutorial below!
Crochet Surface Chain Stitch
If you have not yet tried the crochet surface chain stitch you are going to love this! SO easy, but it really packs a punch!
These surface chain stripes make ALL the difference to this otherwise typical crochet mock turtleneck pullover. What an awesome look!
Crochet Turtleneck Pullover
This crochet mock turtleneck sweater is designed with pure comfort in mind. The body and sleeves are made with a boxy style that makes it a little oversized and roomy. Comfy cozy!
Crochet Pullover Video Tutorial
Be sure to watch the video tutorial for the crochet pullover for women on the YouTube platform (click the little button at the bottom of the video below). This will allow you to comment, give a thumbs up (if you would be so kind) and subscribe. These video tutorials are happily provided FREE to you. I only ask for these little favors to help me continue to bring fellow crocheters fresh crochet designs and patterns. Your support of my work is so greatly appreciated!!
Printable Etsy Pattern
Again, if you would like to support my work, please consider purchasing the inexpensive Etsy pattern: CrazyCoolCrochetUS.etsy.com
This post contains affiliate links which means I may earn a small commission for purchases made from these links at no additional cost to you.
Crazy Cool Crochet is a participant in the Amazon Services LLC Associates Program, an affiliate advertising program designed to provide a means for sites to earn advertising fees by advertising and linking to Amazon.com
SIZING
Instructions are for Size Small/Medium
Instructions for Large/ X Large are in parentheses (X).
Results will vary according to yarn and tension used. Sizing should be considered “suggestions”. Adjust as needed.
Purchase yarn here:
Materials: Yarn White/ #4 medium weight/ 17.5 ounces / 1027 yards/ Black #4 medium weight/ 1/2 ounce Crochet Hook H/ 5mm
Yarn needle
Scissors
Stitch marker (1) or contrasting yarn
NOTE: Photos are shown above corresponding rows.
FRONT PANEL
Ch 61 (73)
Row 1: Sc in 2nd ch from hook and in ea ch across. 60 (72) total sc’s. Ch 1. Turn
Row 2 – 24 (30): Sc in 1st sp and ea sp across. 60 (72) total sc’s. Ch 1. Turn.
Row 25 (31): Sc in 1st 54 (60) st’s. Turn
Row 26 (32): Sk 1st st; sc in next sc and ea ac across the row. 53 (59) sc’s total. Ch 1. Turn
Row 27 (33): Sc in ea st. 53 (59) sc’s. Turn
Row 28 (34): Sk 1st st; sc in next sc and ea ac across the row. 52 (58) sc’s total. Ch 1. Turn
Row 29 – 40 (35-48): Sc in ea st. 52 (58) sc’s. Ch 1. Turn
Row 41 (49): Sc in 1st 51 (57) sc’s. 2 sc’s in last sp. 53 (59)sc’s. Ch 1. Turn
Row 42 (50): 2 sc in 1st sp; sc in ea remaining sp. 54 (60) sc’s. Ch 1. Turn
Row 43 (51): Sc in 1st 54 (60) sp’s. Ch 7 (13). Turn
Row 44 (52): Sk 1st ch; sc in ea of 6 (12) ch’s; sc in ea sp. 60 (72) sc total.
Row 45 – 66 (53- 80): Work in pattern for 60 (72) sc’s for ea row. Cut off yarn.
BACK PANEL
Work as for front panel for 1st 24 (30) rows.
Row 25 (31): Sc in 1st 57 (63) st’s. Turn
Row 26 (32): Sk 1st st; sc in next sp and ea sp across. 56 (62) sc’s. Ch 1. Turn
Row 27 (33) Sc in ea st. 56 (62) sc’s. Turn
Row 28 (34): Sk 1st st; sc in remaining st’s. 55 (61) sc’s. Ch 1. Turn
Row 29 – 40 (35-48): Work 55 (61) sc’s for ea row. Ch 1. Turn
Row 41 (49): Sc in 1st 54 (60) st’s; 2 sc’s in last st. 56 (62) sc’s. Ch 1. Turn
Row 42 (50): Work 2 sc’s in 1st sp; sc in remaining sp’s. 57 (63) sc’s. Ch 1. Turn
Row 43 (51): Sc in ea sp; 57 (63) sc’s. Ch 4 (10). Turn
Row 44 (52): Sk 1st ch; sc in ea of next 3 (9) ch’s; sc in ea sp across the row. 60 (72) sc’s.
Row 45 -66 (53-80): Work ea row for 60 (72) sc’s. Cut off yarn.
SLEEVES (make 2)
Ch 47 (55)
NOTE: The foundation ch determines the length of the sleeve. The number of rows determines the width.
Row 1: Sc in 2nd ch from hook; sc in ea remaining ch. 46 (54) sc’s.
Rows 2 – 47 (53): Sc in 1st sp and ea sp across. 46 (54) sc’s. Cut off yarn.
PLEASE VIEW VIDEO ABOVE FOR BETTER VISUAL INSTRUCTION!
STRIPING (SURFACE CHAINS)
Front and Back Panels are worked the same.
With panel facing right side up, sc rows going up and down, with 2nd color yarn, create a slip knot.
Insert hook from front to back into the 1st sp of Row 3 (9). With the hook, grab the slip knot from underneath the panel; pull through the same sp.
Insert hook into the next sp (above); grab yarn, pull through the same sp; pull through the loop on the hook to create a ch. (The yarn needle points to the correct sp.)
Repeat into ea sp to the end of the row (top/shoulder). Cut off yarn leaving a tail to weave through the back (along the black st’s).
Repeat into ea sp to the end of the row (top/shoulder). Cut off yarn leaving a tail to weave through the back (along the black st’s).
Work the 2nd stripe in Row 23 (29).
Work the 3rd stripe in Row 45 (51).
Work the 4th stripe in Row 63 (71).
Turn panel (front facing up) so the sc rows are situated as you worked the rows (shoulder/neck is now to the left).
Work the 1st stripe in the sp between the 16th and 17th (17th/18th) st’s. Work the 2nd stripe in the sp between the 17th and 18th (18th/19th) st’s (counting from the 1st st from the 1st stripe; not from the beginning of the row).
Work the 3rd stripe in the sp between the 18th and 19th (18th/19th) st.
SLEEVES striping
NOTE: See note below in SEAMS section. These are the stripes that would need adjusting if they are not lining up with the body stripes.
With the sleeve panel right side up; working with the sc rows going up and down, work the 1st stripe into Row 13 (6) and the 2nd stripe into Row 33 (47).
Turn panel so the sc rows are going across. Photo above.
Work the 1st stripe between the 14th and 15th (18/19) st’s.
Work the 2nd stripe between the 18th and 19th (19/22) st’s (counting from the 1st stripe, not from the beginning of the row).
SEAMS
NOTE for Size Lg/XL: Prior to seaming, ensure the stripes are lining up with the sleeve and body. Rework the sleeve stripes if needed.
With wrong sides facing you, place front and back panels together.
Seam shoulders using yarn needle, length of yarn and whip stitch.
With wrong sides facing you, situate the sleeve with rows going across (not up and down); mark center of sleeve with st marker and position at shoulder seam. Use stitch marker to mark the center. Using yarn needle and length of yarn, use whip st to seam sleeve to body. Cut off yarn.
Using same method, seam at side edges working from bottom, up along the edge and along the bottom of sleeve. Ensure the stripes of each panel are lining up.
COLLAR
NOTE: The beginning ch determines the depth of the collar. Adjust as needed.
With right side up, attach yarn into the center of the back neck with a ch. Work 9 more chains.
Sc in 2nd ch from hook and ea ch across. 9 sc’s.
*Sk the next sp of the neck edge, sl st into the next sp. Turn the sc strip to face you.
Work a sc in ea sp. 9 sc’s. Ch 1. Turn
Sc in ea sp*.
Repeat from * to * around the neck edge.
NOTE: You may sk additional sp’s along the neck edge as necessary to avoid a collar that is too full and bunched up.
End with the last st being worked in the neck edge into the beginning ch.
To seam the two edges of the collar, with yarn still on the hook, turn so you are working on the wrong side. Use sl st’s to seam the two edges. Cut off yarn.
Weave in all tails.
Copyright © 2022 Sylvia Talo You may sell items made from my patterns. Please include a link or reference to my shop CrazyCoolCrochetUS.etsy.com. Pattern and photos are copyright protected; they may not be reproduced, redistributed, or displayed publicly in any manner.
