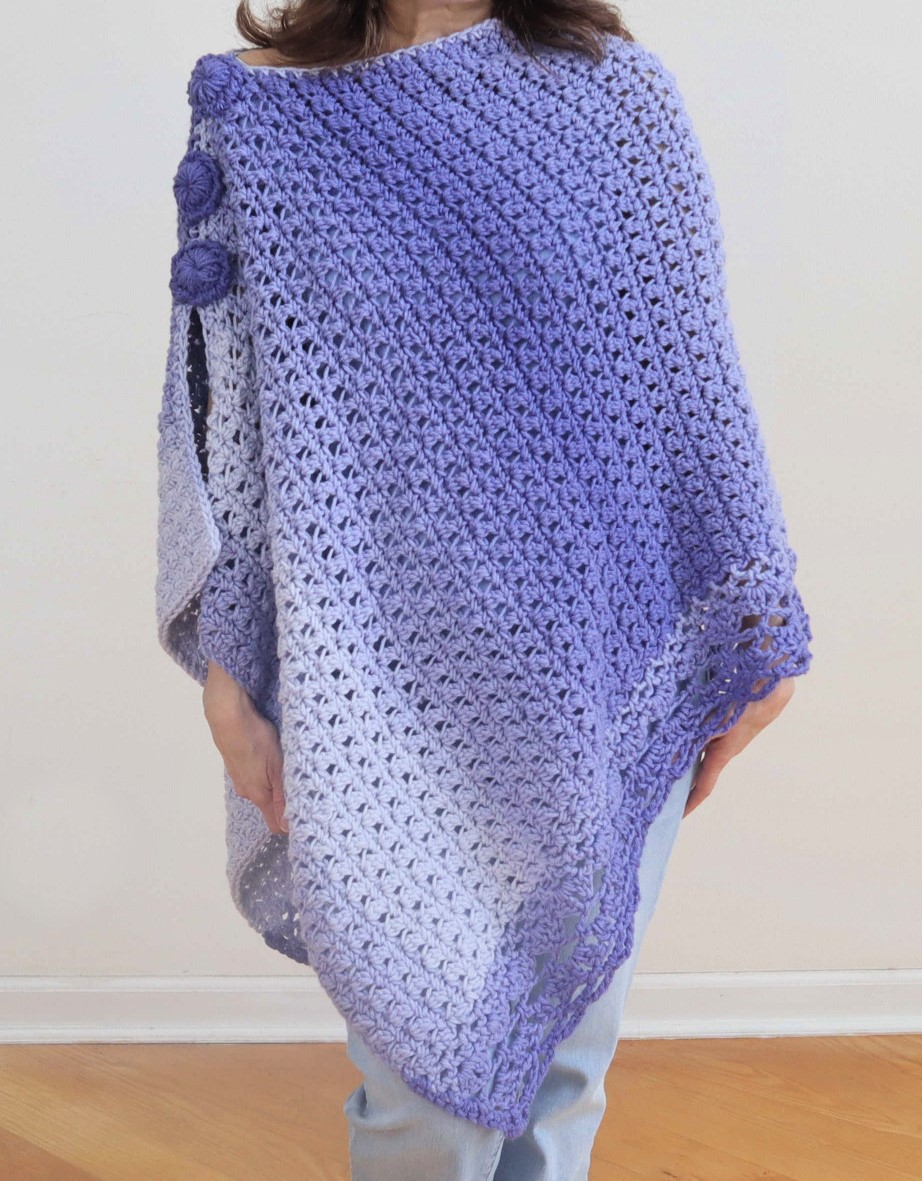
Beautiful Crochet Asymmetrical Poncho with super easy CROCHETED BUTTONS! The asymmetrical design and gorgeous wide border make this extra special. Uses very inexpensive, readily available #4 medium weight yarn in a blue ombre.
Crochet Poncho Border
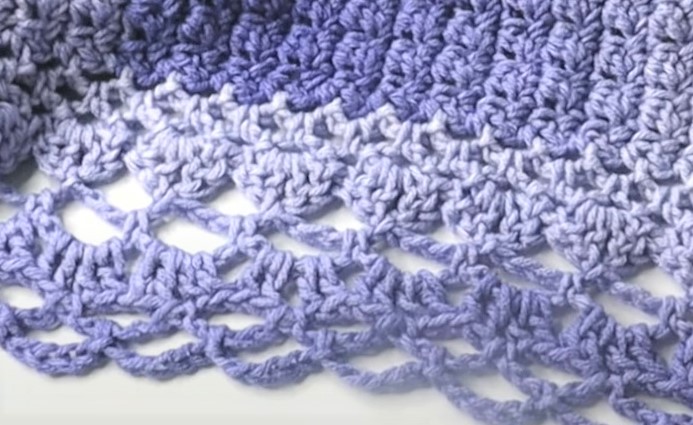
This uses a fun, unusual, easy crochet stitch for the body and simple crochet filet and double crochet clusters for the wide border.
Crochet Button
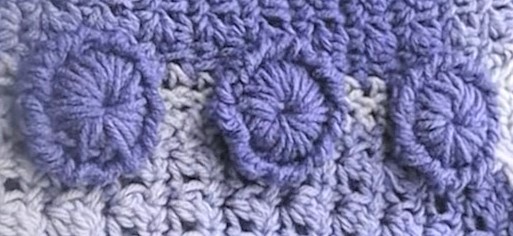
If you have never tried a crochet button…you are in for a treat! Super easy!! You will want to find more patterns to use this crochet button pattern. Works up very fast and uses very little yarn.

Crochet Poncho Video Tutorial
As always, I ask that you please watch the video tutorial for the crochet poncho on the YouTube platform (click the little button at the bottom of the video below). This will allow you to comment, give a thumbs up (if you would be so kind) and subscribe. These video tutorials are provided FREE to you. I am long term unemployed and this is my only source of income (yikes!). Your support of my work is so greatly appreciated!!
Printable Etsy Pattern
The printable Etsy version of this crochet asymmetrical poncho can be found here: CrazyCoolCrochetUS.etsy.com
This post contains affiliate links which allows me to earn a small commission for purchases made from these links at no additional charge to you.
CrazyCoolCrochet.com is a participant in the Amazon Services LLC Associates Program, an affiliate advertising program designed to provide a means for sites to earn advertising fees by advertising and linking to Amazon.com
Purchase this yarn here:
Yarn/ Red Heart Super Saver / Ombre / color Baja Blue / 17 ounces / 804 yards
Crochet Hook J / 6mm
Measuring Tape
Scissors
Stitch markers (may use contrasting color yarn)
Photos coming soon! Please view the video tutorial above for additional visual instruction!
Size Small/Medium
NOTE: Poncho is shown on a very short adult female. Poncho will not fit as long on an average height person.
Instructions for Large/ X Large, 1X/2X and 3X/4X are in parentheses (X).
Results will vary according to yarn and tension used. Sizing should be considered “suggestions”. Adjust as needed.
Dimensions Size Small:
52 inches long; 24 inches wide including border
NOTE: Photos are shown above corresponding rows.
NOTE 2: Work tension loosely for the entire project.
Ch 57 (67, 77, 87) The foundation chain determines the width of the panel. Each additional 10 chains results in 4 additional inches.
Row 1: Sc in 2nd ch from hook and in ea ch to last ch. 56 (66, 76, 86) sc’s. Ch 2 .Turn
Row 2: Sk sp under the turning ch; *in next sp, insert hook, pull yarn through for two loops on hook; grab yarn and pull through 1st loop for two loops remaining on the hook; in the same sp, YO, pull yarn through for 4 loops on hook; pull yarn through all 4 loops; ch 1. Sk the next sp* ; repeat from * to * working the last sequence into the last sp. Ch 1. Turn
Row 3: Sc in ea sp. 56 (66, 76, 86) sc’s. Ch 2. Turn
Repeat Rows 2 and 3 to complete a total of 121 (127, 133, 133) rows. End with a sc row. Cut off yarn.
NOTE: Add or subtract rows to your preferred length, ending with a sc row.
Finishing: This edge is the one along the neck/shoulder. With right side facing you, the hook still in the last sc of the last row, turn the panel so the long edge is on “top”. Work an additional sc into the same sp. Work a sc into ea sp along the long edge to the last sp, ensuring sc’s are evenly spaced. Cut off yarn.
BORDER
Row 1: With right side facing you, working along the opposite long edge, insert yarn into right corner sp. Ch 1 to lock in the yarn. Work 3 more ch’s for 4 total ch’s. Sl st into the 1st “cluster row”; *ch 3; sk the sc row; sl st into the next “cluster row”*; repeat from * to * to last cluster. Sk last cluster, ch 3; sl st into corner ch. Ch 4. Turn
Row 2: Sl st into ea ch 3 sp across the row. Sl st into the turning ch. Ch 4. Turn
Row 3: Repeat Row 2.
Row 4: Dc into the first ch sp; ch 1; work 2 dc’s in the same sp; *sl st into the next ch 3 sp; 2 dc’s in the next ch 3 sp; ch 1; 2 dc’s in the same sp*; repeat from * to * the last sp. Ch 3. Sl st into the turning ch. Ch 5. Turn
Row 5: Sl st into the 1st ch 1 sp (between the 4 dc’s); ch 4; sl st into the next ch 1 sp; repeat from * to * the last “dc cluster”. Sk the last ch 1 sp; sl sti into the turning ch. Ch 5. Turn
Row 6: Sl st into the 1st sp; *ch 5; sl st into the next sp*; repeat from * to * to the last sp. Ch 5; sl st into the turning ch. Ch 4. Turn
Row 7: Dc in the 1st sp; ch 1; 2 dc’s in the same sp; *2 dc’s in the next sp; ch 1; 2 dc’s in the same sp*; repeat from * to * into ea sp. Work the same dc cluster into the turning ch sp entering the last dc into the turning ch. Ch 4. Turn
Row 8: Sl st into the 1st ch 1 sp; *ch 4; sl st into the next ch 1 sp*; repeat from * to * to the last cluster. Sk the last ch 1 sp of that last cluster; sl st into the turning ch. Ch 5. Turn
Row 9: Sl st into the 1st sp; *ch 5; sl st into the next sp*; repeat from * to * across the row. Sk the last ch 4 sp; ch 5; sl st into the turning ch. Ch 1.
Turn the panel slightly so the short edge of the border rows is facing you.
Enter 2 sc’s into ea sp until you reach the sc’s already worked into that panel edge. Sl st into the 1st sc of that edge. Ch 2. Cut yarn. Squeeze the 2 ch’s to form a knot. Weave in the tail.
Repeat for the opposite side of the border rows.
SEAM SHOULDER
With wrong side facing you, fold panel in half. Working on the neck/shoulder edge of panel, measure about 10.5 inches from the fold for the neck opening. Attach stitch marker. Measure about 7 inches from that st marker and attach the 2nd st marker. Using yarn needle and length of yarn, use a whip st to seam from the 2nd st marker to the first st marker (shown with arrow). Cut off yarn. The bottom is left open.
BUTTON (decorative; no button holes needed)
Wind yarn around your index finger (or a pen) about 17 times. Carefully remove, holding tightly so it does not unwind.
Row 1: Insert hook through center to pull yarn through for a sc. Continue with sc’s all the way around for as many as needed to cover strands and create ring. Sl st in 1st sc. It will be thick!
Row 2: Without turning, sc around the ring again, working over the row of previous sc’s. Sl st in the first sc of this row. Ch 1. The goal is to create a puffy button with the center hole barely showing.
Row 3: Working in reverse single crochet, work sc’s in ea st working from right to left (backward), around the ring. Sl st in 1st st. Tie off.
Attach buttons to panel. Situate the buttons along the shoulder seam. Using yarn needle and length of yarn, working along the reverse sc row, insert the needle from underneath the panel, up through one strand of the panel on the front side, over one strand of the button, over the button and through the button and panel. Repeat around the perimeter of the button ending with the needle underneath the panel. Cut off yarn. Tie the two strands together and weave in ends.
Copyright © 2022 Sylvia Talo You may sell items made from my patterns. Please include a link or reference to my shop CrazyCoolCrochetUS.etsy.com . Pattern and photos are copyright protected; they may not be reproduced, redistributed, or displayed publicly in any way.
You May Also Like


How many skeins of yarn did you use? I may have missed this somewhere. I have 3 skeins of the ombre yarn that I made into a project. I didn’t like the way it worked out so I have taken it all apart and I think this would be perfect.
Hi Pam,
The info is right below the Amazon graphic of the ombre yarn. It states: Yarn/ Red Heart Super Saver / Ombre / color Baja Blue / 17 ounces / 804 yards
Each skein was 10 ounces. This was for size small.
Hope this helps.
Sylvia
CrazyCoolCrochet.com