
Don’t you just LOVE this CLASSIC Crochet Cable Sweater? Free pattern and video tutorial is below. The cable stitch used here is the EASIEST Cable Stitch EVER. Ok, the instructions and photos might look a little intimidating, but I promise you…compared to other crochet cable stitch patterns…this is so much easier.

Check out the video tutorial to view the instructions and get a better idea of how to work this crochet cable sweater.

Printable Pattern for Crochet Cable Sweater
If you would like to support my work and would like to continue to see these amazing Crazy Cool Crochet designs, please watch the video on the YouTube platform (the link is below) in it’s entirety (or at least a few minutes). YouTube places great importance on the watch time for these videos. Thanks a bunch!!
VIDEO TUTORIAL CROCHET CABLE SWEATER
This post contains affiliate links which means I may earn a small commission from purchases made from these links at no additional cost to you.
Classic Crochet Cable Sweater
Women’s Size Small
Instructions for Medium, Large, XLarge, 1X and 2X are in parentheses (X).
Sizing suggestions are approximate. Personal tension and yarn used will affect the end result. Adjust as needed.
Dimensions:
For size small shown – 19 inches from shoulder to bottom. 21 inches wide (one panel).
Pattern will add approximately 2 inches in width and length for each size larger.
Materials:
Yarn used: #4 medium weight ; I Love This Yarn / 23 ounces; 1100 Yards / Color Peacock
Crochet hook size G / 4.25 mm
Yarn needle
Scissors
Gauge: 12 DC = 4”, 10 rows dc and sc = 4 inches
Please watch the video tutorial above, and/or purchase the Etsy pattern with lots of photos for detailed instructions on the Front Post Double Crochet (FPDB), Back Post Double Crochet (BPDC) and the crochet cable stitch.


Cable = Work first half of cable around the designated (per instructions below) DC of Row 1 (as if for a FPDC) as follows:, *YO; insert hook from front to back, around the back of the dc and back through the front; hook yarn. and pull up a long loop; pull yarn through first two loops on hook*; in same sp repeat from * to * 3x . You will have 5 loops on the hook. Pull yarn through all 5 loops.

Sk next sc (behind the cable); dc in ea of next two sc’s.


Work second half of cable around the next dc of Row 1 (next to the 1st half of cable) as for the first half of cable above.
FRONT PANEL
Bottom Ribbing
Ch 60 (66, 72, 78, 84, 90)
Row 1: dc in 3rd ch from hook and each ch across. 58 (64, 70, 76, 82, 88) dc’s. Ch 2. Turn
Row 2: FPDC around the 1st Dc post below; *BPDC around the next Dc Post below; FPDC around the next Dc post below*. Rpt from * to * to the end of the row. Dc into the turning ch. Ch 2. Turn
Rows 3 – 4 (4, 4, 6, 8, 8): *FPDC around the FPDC below. BPDC around the BPDC below*. Repeat from * to * to end of row. Enter a DC in the turning ch. Ch 2. Turn
BODY
Row 1: Work 2 DC’s in 1st st; 1 DC in ea st to the last st. Work 2 DC’s in the last st. 60 (66, 72, 78, 84, 90) DC’s Ch 1. Turn
Row 2: Sc in ea st. 60 (66, 72, 78, 84, 90) SC’s. Ch 2. Turn
Row 3: DC in ea st. 60 (66, 72, 78, 84, 90) DC’s Ch 1. Turn
Rows 4 – 31 (35, 39, 43, 47, 51): Rpt Rows 2 and 3.
Row 32 (36, 40, 44, 48, 52): Rpt Row 2.

Row 33 (37, 41, 45, 49, 53): Work 20 (22, 24, 26, 28, 30) Dc’s. Ch 1. Turn
Row 34 (38, 42, 46, 50, 54): Rpt Row 2 working with 20 (22, 24, 26, 28, 30) st’s.
Row 35 (39, 43, 47, 51, 55): Rpt Row 3 working with 20 (22, 24, 26, 28, 30) st’s.
Row 36 (40, 44, 48, 52, 56): Rpt Row 2 working with 20 (22, 24, 26, 28, 30) st’s. Tie off yarn.
Opposite Side
Row 33 (37, 41, 45, 49, 53): Sk 20 (22, 24, 26, 28, 30) st’s. Attach yarn in next st. Ch 2. Dc in ea st for 20 (22, 24, 26, 28, 30) Dc’s. Ch 1. Turn.
Rows 34 – 36 (38 – 40, 42 – 44, 46 – 48, 50 – 52, 54 – 56) Rpt pattern as for the previous side. Tie off yarn.
BACK PANEL
Repeat pattern as for the Front Panel working even through Row 34 (38, 42, 46, 50, 54).
Row 35 (39, 43, 47, 51, 55) : DC in 1st 20 (22, 24, 26, 28, 30) st’s. Ch 1. Turn
Row 36 (40, 44, 48, 52, 56): Sc in ea st. Tie off yarn.
SLEEVES (make 2)

Ribbing
Ch 30 (32, 32, 34, 34, 36)
Row 1: dc in 3rd ch from hook and each ch across. 28 (30, 30, 32, 32, 34) dc’s. Ch 2. Turn
Row 2: FPDC around the 1st Dc post below; *BPDC around the next Dc Post below; FPDC around the next Dc post below*. Rpt from * to * to the end of the row. Dc into the turning ch. Ch 2. Turn
Rows 3 – 4: *FPDC around the FPDC below. BPDC around the BPDC below*. Repeat from * to * to end of row. Enter a DC in the turning ch. Ch 2. Turn
Sleeve Body

Row 1: Work 2 DC’s in ea of next 5 (6, 6, 7, 7, 9) st’s; 1 DC in ea st to the last 5 (6, 6, 7, 7, 9) st’s. Work 2 Dc’s in ea of the last 5 (6, 6, 7, 7, 9) st’s. Work 1 Dc in the turning ch. 38 (42, 42, 46, 46, 52) Dc’s. Ch 1. Turn
Row 2: Sc in ea st. 39 (43, 43, 47, 47, 53) sc’s. Ch 2. Turn
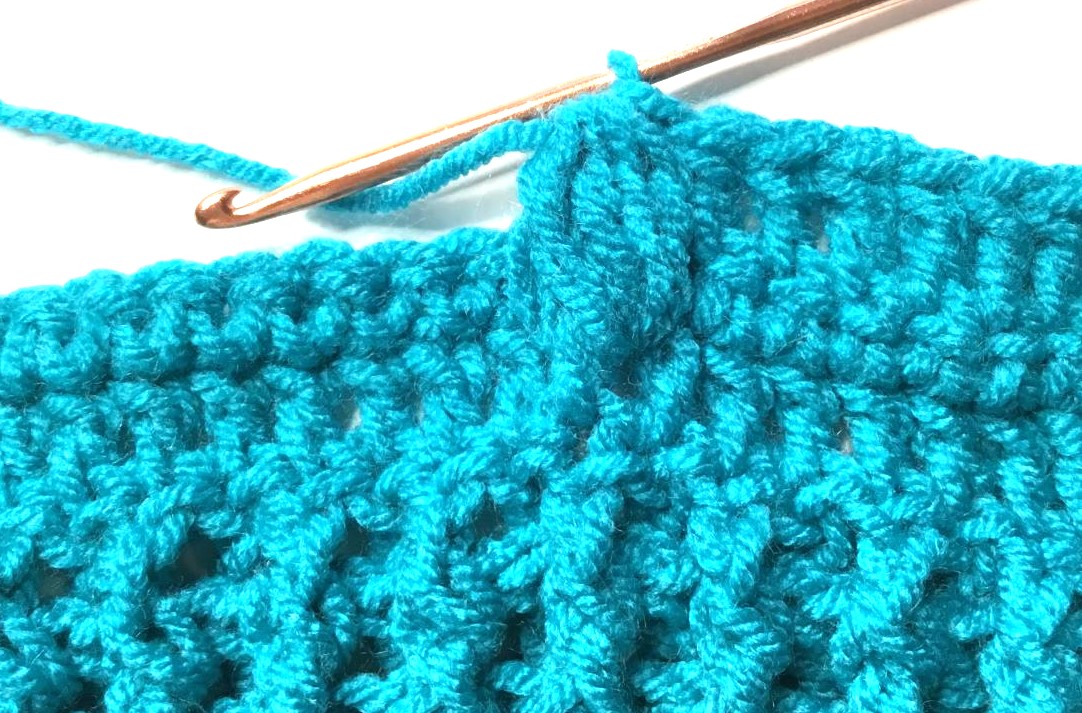
Row 3: Dc in ea of the next 16 (17, 17, 19, 19, 22) st’s. Work a Cable (follow instructions above for first half and second half of cable) around the 17th (18, 18, 20, 20, 23) Dc post of Row 1. Dc in the next sc of row (3rd photo above). Work another Cable skipping the Dc next to the first cable. Dc in remaining sc’s. Ch 1. Turn
Row 4: Sc in ea st. 41 (43, 43, 47, 47, 53) sc’s. Ch 2. Turn
Row 5: Dc in 1st 16 (17, 17, 19, 19, 22) st’s. Work first half of Cable around the 1st of two Dc’s between the first cable below (red arrow). Skipping the sc behind the Cable, DC in ea of the next two sc’s. Work second half of cable around the 2nd Dc in between the cable below. DC in the next Sc of the row. Work another full cable working in the two Dc’s between the second cable below. [Remember to skip the sc behind the Cable and DC in ea of the next two sc’s before working the second half of the cable.].Dc in ea of the remaining sc’s. Ch 1. Turn
Rows 6: Sc in ea st. 41 (43, 43, 47, 47, 53) sc’s. Ch 2. Turn.
Row 7 – 32 (34, 34, 36, 36, 40): Rpt Rows 5 and 6 ending with a sc row.
Attaching Panels
Turn panels right sides together. Seam at shoulders with yarn needle using a whip st.
Seam at sides and bottom of sleeve.
NECK RIBBING

Row 1: With right side facing you, attach yarn at the shoulder seam. Ch 2. Work a DC into approximately ea st of the neck opening. Join with a sl st to the beginning Ch 2. Ch 2. Do not turn.
Row 2: Work FPDC, BPDC ribbing. Join with a sl st to the beginning Ch 2. Ch 2. Do not turn.
Rows 3: Work a FPDC around ea FPDC and a BPDC around ea BPDC. Join with a sl st to the beginning Ch 2. Ch 2. Do not turn.
Rpt Row 3 to your desired depth. At end of last row tie of yarn.
Sharing:
You may use one or two photos with a link to this post in your round up post. You may NOT copy and post the written pattern or video in your post. Thank you.
Copyright © 2022 Sylvia Talo You may sell items made from my patterns. Please include a link or reference to my shop CrazyCoolCrochetUS.etsy.com . Pattern and photos are copyright protected; they may not be reproduced, redistributed, or displayed publicly in any way.
You May Also Like


