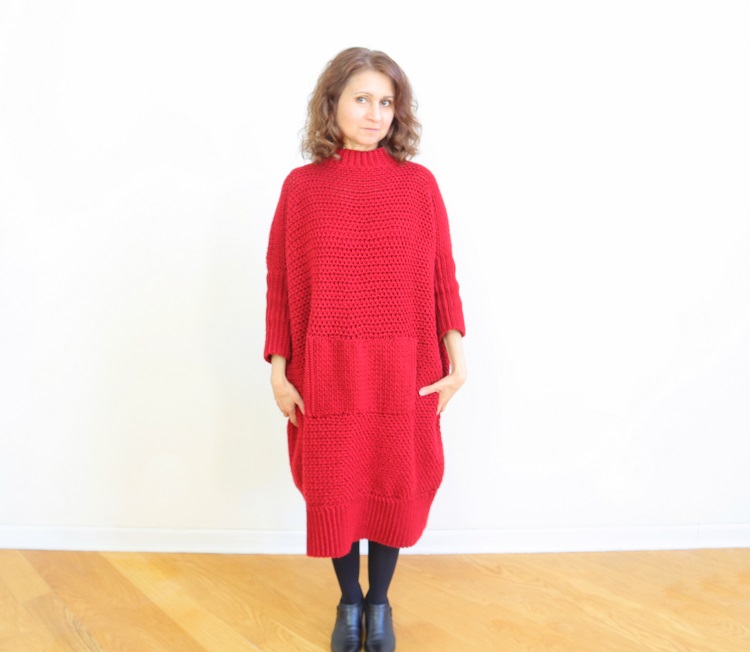
SO versatile! This crochet oversized sweater dress can easily be made short or long. Skip the large front pocket and wear it with a wide belt for a different look. Easily adjusts for larger sizes. No multiple required!
The video tutorial below is provided for your convenience. Please view it on YouTube so you can hit the red Subscribe button and give me a big ole Thumbs UP. That, along with watching the video all the way through (or at least a few minutes) is the best way to support my efforts. Thank you so much!!
Printable pattern with sizing detail is available at my Etsy shop: CrazyCoolCrochetUS.etsy.com
Size Small
This pattern requires no multiple and easily adjusts for size by making more or fewer rows for length and adding chains to the beginning foundation chain (in an even number).
Instructions for Medium, Large, X Large 1X and 2X are in parentheses (X).
Results will vary according to yarn and tension used. Sizing should be considered “suggestions”. Adjust as needed.
This post contains affiliate links. If you make a purchase from these links I may earn a small commission at no additional cost to you.
Materials size Small:
Yarn: Caron Simply Soft / Autumn Red/ 6.25 skeins (6 oz each)/ 1969 yards
Crochet Hook H/5mm and G/4.25 mm
Yarn needle
Scissors
Measuring Tape
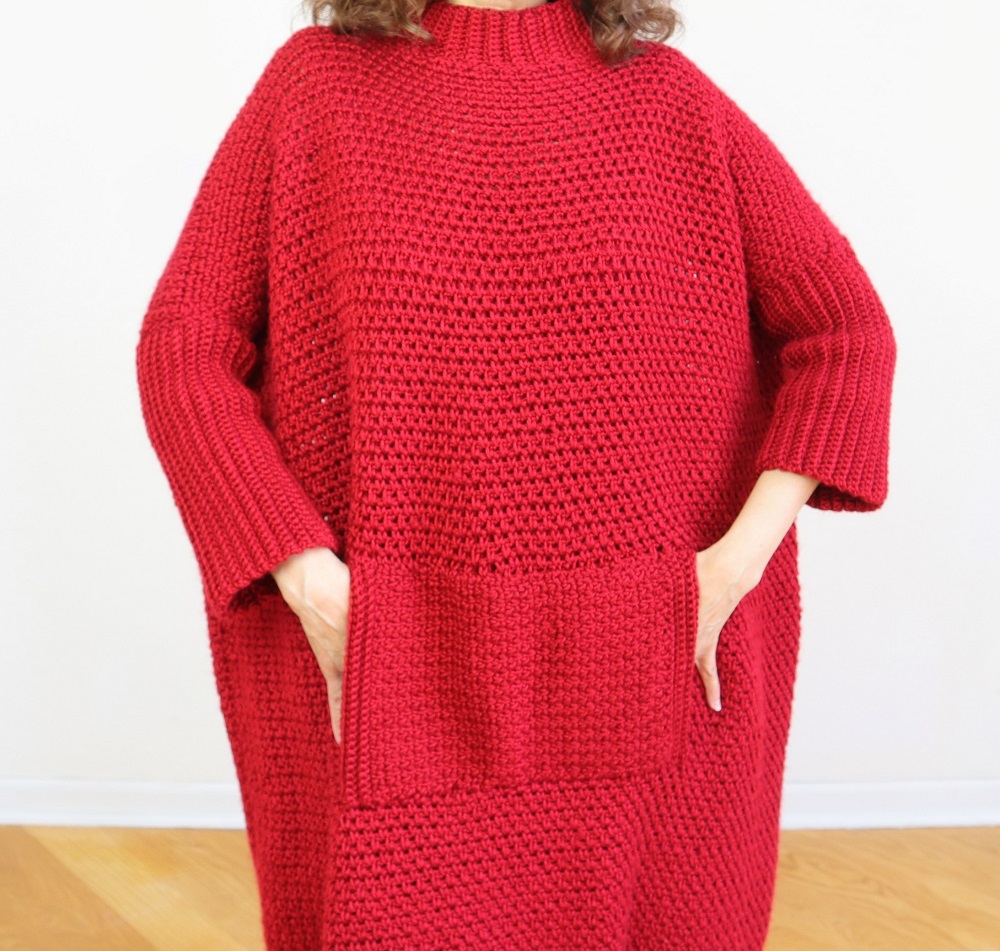
NOTE: Photos are shown above corresponding rows.
BODY PANEL (make 2)
Ch 130 (140, 150, 170, 190, 210) using larger hook
Row 1: sc in 2nd ch from hook; *ch 1; sk next ch; sc in next ch*. Repeat from * to * to last ch. sc’s 65 (70, 75, 85, 95, 105) sc total. Ch 2 Turn
Row 2: sc in 1st sp; *ch 1; sc in next sp*. Repeat from * to * to last visible sp. Enter the last sc in the sp before the turning ch. 65 sc (70, 75, 85, 95, 105) sc. Ch 2 Turn
Rows 3 – 98: Repeat Row 2. Cut off yarn after the last row.
NOTE: You may adjust rows to your preferred length allowing for an additional 6 inches for the bottom ribbing.
SEAMS
With wrong sides facing you, place front and back panels together.
Using yarn needle, length of yarn, and a whip st, seam at shoulders. Seam from armhole edge to neck opening (approximately 10 inches). Seam from bottom of panel edges to the armhole opening.
BOTTOM RIBBING
Ch 24 (28, 32, 40, 48, 56) using smaller hook
Row 1: sc in 2nd ch from hook; sc in ea ch to the last ch. 23 (27, 31, 39, 47, 55) sc total. Ch 1. Turn
Row 2: sc in BLO of ea sp. 23 (27, 31, 39, 47, 55) sc’s. Ch 1. Turn
Repeat Row 2 for 52 (54, 56, 60, 64, 68) inches in length. Cut off yarn at end of last row.
Seam: With ribbing wrong side out, seam the short ends with yarn needle and length of yarn.
NOTE: Ribbing should be about 3 inches shorter than the width of the body. This allows for gathers when attached.
ATTACH RIBBING
Center the ribbing along the bottom of the body. With right sides of body and ribbing facing up, use a yarn needle and length of yarn to seam ribbing to the body. Begin by entering the needle in the side body seam, then enter the needle in the along the seam of the ribbing. You are entering in needle in the two-strand chains of each panel.
Work into every “chain” of the ribbing edge. You will be skipping every few stitches of the body to create gentle gathers. For example, approximately every 10th st of the body, skip two st’s and enter into the next st of the body bottom.
SLEEVE RIBBING (make 2)
Working with right sides facing up, with smaller hook, attach yarn into bottom of armhole opening in the seam.
Ch 41 (45, 45, 49, 49, 53)
Sc in 2nd ch from hook and ea ch across. 40 (44, 44, 48, 48, 52) sc’s.
*Sl st into every other sp of armhole edge. Do not sl st into every sp.
Slightly turn the sc piece toward you. Sc in BLO of ea sc across. At end of row, ch 1, turn.
Sc in BLO of ea st.* 40 40 (44, 44, 48, 48, 52) sc’s.
Repeat from * to * until you have worked entire armhole. End at the armhole edge. Cut off yarn.
NOTE: The sleeve should not be too wide. The sleeve should fit snuggly on the forearm.
Seam: Turn garment inside out. With yarn needle and length of yarn, using whip st, seam sleeves closed. Tie off yarn.
NECK RIBBING
Using the same technique used for the sleeve ribbing, attach yarn in a seam.
Ch 11
Work as for sleeve ribbing for 10 sc’s in BLO. As for sleeve, skip every other sp along neck opening when working sl st’s.
Work around entire neck opening. Cut off yarn.
POCKET (optional)
Instructions are for a 12.5 inch wide pocket. You may adjust using a foundation ch with an even number.
Ch 30
Work pocket the same as for the body Rows 1 and 2 for a total of 41 rows (or to your preferred size).
Ribbing: At short edges work 4 rows of BLO sc’s working in ea sp for 30 sc’s.
Attach pocket at center of front body panel. With front sides facing up, using yarn needle and length of yarn, gently whip stitch across long edges. Do not stitch too tightly to avoid puckering. White st marker used to determine center placement.
Copyright © 2021 Sylvia Talo You may sell items made from my patterns. Please include a link or reference to my shop CrazyCoolCrochetUS.etsy.com . Pattern and photos are copyright protected; they may not be reproduced, redistributed, or displayed publicly in any way.
You might also enjoy this crochet sweater:

You May Also Like


❤️ this oversized sweater dress! Would you Pleas3 reply with yardage needed for a size medium? Thank you.
Hi Anne,
I’m happy you like this crochet dress.
For a size medium I would recommend approximately 2300 yards of the yarn used here.
Best,
Sylvia